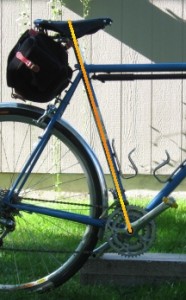
This is the third in a series of pages on sizing a touring bike. The series should be read in order. The first page is here. Saddle height refers to the distance from the center of the bottom bracket, or crankset, to the top surface of the saddle measured in a straight line parallel to the seat tube. Like this.
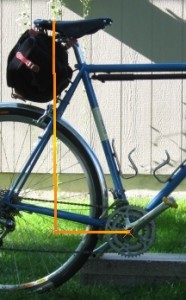
Saddle set-back refers to how far the saddle is behind the bottom bracket.
It might look as if the vertical line hits the saddle in an arbitrary spot, but since saddles come in different shapes and lengths it’s useful to measure to the spot where the rider will perch. Ideally, this is where the saddle supports the ischial tuberosity or the sitz bones of the rider, and is often the spot on the saddle where it is the widest. Most people probably will not measure this directly, rather they will determine the set-back whilst sitting on the bike….but we will go over that later.
Why is saddle height and set-back important? I can remember more than one time when I have had to call to be rescued from a bike ride when the pain in my knee made it hard to continue. And those types of injuries take a long time to heal- time off the bike! ( this was before I knew how to measure my saddle height and it happened one time when I had done some work on my bike and forgotten to reset the saddle to the correct height).
Wulll, how do I figure out the saddle height? Back in the day, Greg Lemond and his coaches came up with a formula for saddle height based on numerous tests and years of experience with professional riders. Saddle height won’t be significantly different for the racer than for the tourist, the physiology stays the same. And I’ll betcha the guy charging you $200 for a bike fit is using some method to get to the same place. Anyways, here is how you do it:
Stand facing a wall, in your stocking feet and on a hard, un-carpeted surface. Oh yeah, hold a thin, hardcover book between your legs and stand close enough to the wall that the book touches it. Pull up hard on the book and mark the spot on the wall where the top edge hits when it’s parallel with the floor. Measure from this mark down to the floor. Let’s call this your inseam. Your inseam multiplied by .883 is your saddle height. Grant Petersen at Rivendell uses the same measurement but determined that subtracting 10 centimeters from the inseam measurement results in very close to the same saddle height number. There is some leeway with either one of these methods because there are other variables, such as foot length, what type of pedals and shoes you will use when riding and where your foot is on the pedal (on the ball, arch, or somewhere in between), and crank arm length.
Saddle set-back is not quite as straight forward. Greg Lemond used the plumb bob from the front of the knee cap method and this has become sort of a default standard. Some people poo-poo this technique but it works well as a starting point for most people. To set your saddle setback using a plumb bob ( a plumb bob is a piece of string with a several ounce weight tied to one end) you need to sit on your bike on a level surface where you can hold yourself up. This works a lot better with a helper and works even better if the bike is clamped into a stationary trainer.
Sit on the bike in a natural riding position. This is where a trainer comes in handy because you can actually pedal a few strokes to make sure your body is in a balanced riding position. Stop pedaling with your crankarms parallel to the floor, or 3 o’clock and 9 o’clock. Hold the plumb bob line to the front of your forward kneecap and let the weight fall freely down past your foot. The plumb line should bisect the pedal axle or fall 1 to 2 centimeters behind it. Obviously, you can slide your rear end forward and backward on the saddle depending on whether you are climbing or “on the rivet” but there is a sweet spot where you will be most of the time.
Alrighty then, we have the saddle height and set-back nailed down. The next thing to think about is the handlebars.


Recent Comments