Greetings! I’m a new voice here so I’ll briefly introduce myself. My name is Ryan King and I’ll be riding the inaugural Smoke ‘n’ Fire 400 bikepacking race with the support of the good folks at Bike Touring News. I’ve done a small handful of rides like this, including the Oregon Outback in May of this year and a four-day trip on the Idaho Hot Springs Mountain Bike Route in July but this will be my first solo, race-type bikepacking trip. I’ve always sought out new ways to push my limits as a rider and am excited (and a little nervous) about seeing what I’m capable of through this test. As a first-time “racer” I’m no expert at any of this so I hope that I can offer some insight into my approach to this event and help others learn from my successes and mistakes while encouraging them to undertake similar challenges of their own.
Bicycle travel can be as simple or complex as you want to make it. I think this is part of why I enjoy a bikepacking-style approach and make every effort to streamline and simplify my trip rather than finding ways to bring more and more gear. This takes a good deal of planning and head-scratching sometimes but the joyful freedom of pedaling a bike packed with everything you need and nothing you don’t is well worth the extra work ahead of time.
So, let’s get down to the nitty-gritty. What do you bring on such a journey and how do you carry it? Let’s start with the “how” and then get into the “what” after that.
Luggage
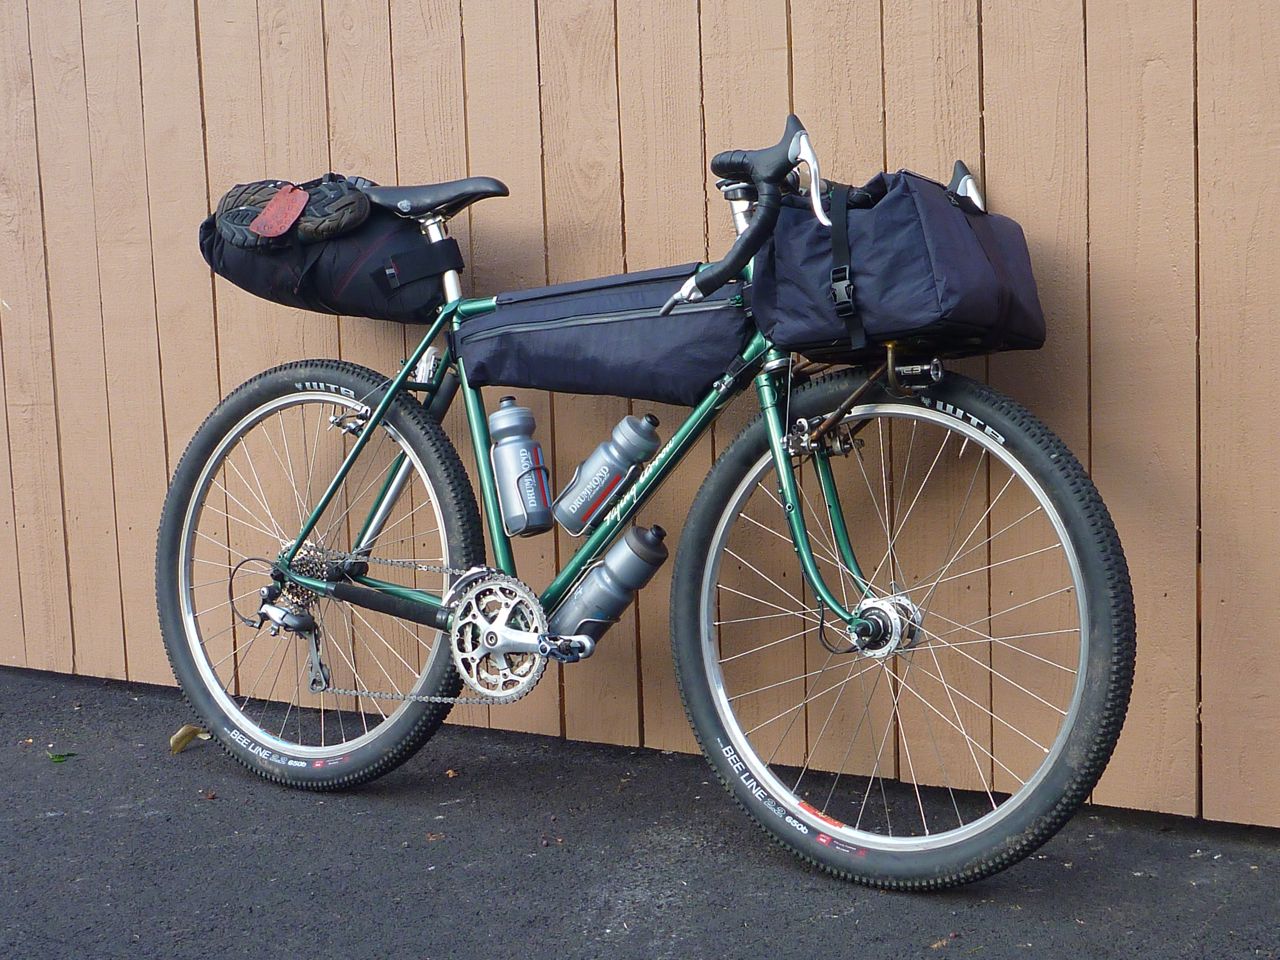
For me, the first decision isn’t so much what to pack as how to carry it. The carrying capacity offered by traditional rack-and-pannier setups is appealing (and ideal for longer trips) but their bulk makes them impractical when one intends to travel light and fast over more rugged terrain. The benefits of bikepacking-style luggage have been extolled elsewhere but the main advantages for my purposes are lighter overall weight, improved aerodynamics and more clearance on narrow trails or when pushing the bike.
My setup differs slightly from the “standard” bikepacking kit in a couple of ways. First, I prefer not to carry a backpack or hydration pack so I use a half-frame bag that fits under the top tube with room for water bottles in their cages. The frame bag does fit a 100 oz. hydration bladder to stretch my water-carrying ability when needed. Also, my bike is built around drop bars and a medium-size front rack, so I use a rack mounted handlebar bag rather than a handlebar harness. This allows me to carry odd shaped, non-compressible items and offers fairly easy access to all of the bag’s contents without having to unpack. For routes consisting of roads and easy singletrack, I find this setup to be ideal.
Although it can create something of a packing nightmare when trying to find space for everything, I find it important to place constraints on the amount of gear I’m able to carry by not allowing myself a place to put it. This forces a higher level of planning and prioritization that pays off if done right. Of course, there are potentially serious consequences to leaving a key piece of gear at home but experience and research will be your guide when it comes to what really matters. Overall, a lighter bike is more fun to ride, you’ll get up the climbs with greater ease, cover rough terrain more easily and be able to enjoy your time in the saddle much more. If your trip involves more time spent in camp than on the bike, you’ll want to pack very differently.
Here’s my luggage for the Smoke ‘n’ Fire:
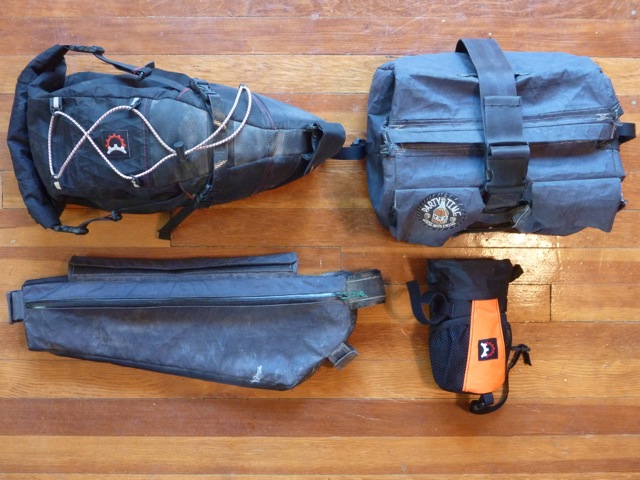
- Revelate Viscacha Seat Pack
- DIY Handlebar Bag
- DIY Half-Frame Bag
- Revelate Feed Bag
Sleep Kit
This is one department where opinions are as varied as the riders espousing them. Some will sleep very little or plan to use lodging along the route, carrying only the bare minimum for survival if forced to camp. Others will carry a full-size tent, air mattress and perhaps even a camp chair. Others prefer a hammock rather than sleeping on the ground. In wet climates a synthetic-fill bag may outperform down which loses its loft when wet. As outdoor gear gets lighter and more packable, there are lots of good options for bikepacking-friendly gear in this department if you have the coin to spend. My low-budget approach forces some compromise and I carry more weight and bulk in sleep kit than I would prefer but I know I’ll stay dry and warm in anything but full-on winter conditions.
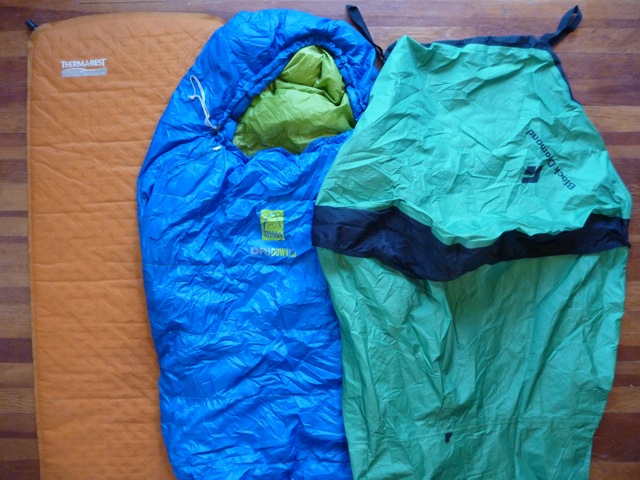
- Therma-Rest Prolite 3 Sleeping Pad, Small
- Sierra Designs Zissou 23° Sleeping Bag, 700-fill “Dri-Down”
- Black Diamond (Bibler) Bipod Bivy w/single pole and 4 stakes
Tools, Spares, First Aid
One of the great joys of traveling by bike is its efficiency. On a bicycle you have ability to cover an immense amount of distance each day, even over terrain that would stop a four-wheel-drive truck in its tracks. However, one mechanical issue at the wrong time will turn your amazing machine into a glorified luggage cart. If you don’t like the idea of pushing or dragging your bike for miles on end it is critical to carry the tools needed to fix common mechanicals and know how to use them. Most modern bikes require only a handful of hex wrenches to perform the majority of adjustments or repairs you’d need to make on the road. Don’t go off the deep end preparing for every potential catastrophe and weigh yourself down with several pounds of hardened steel that you’ll never use. If you maintain and service your bike before your trip, you shouldn’t have to perform major repairs in the field. There also comes a point where you have to place your trust in your equipment and hope for the best. Your tool needs will vary depending on your bike and route but my tool roll holds pretty much the same kit I would take on a long day ride with the addition of a few “just in case” items.
My first-aid kit looks small by comparison but I tend to ride very carefully on trips like this and rarely suffer much more than the odd abrasion. The Smoke ‘n’ Fire route is never too far from major roads or outposts of civilization, so I’ll rely on outside medical aid in case of anything more severe.
I plan to use my GPS unit and cue sheet for primary navigation but always like to have good old paper maps as a backup. I don’t like to place too much trust in electronics.
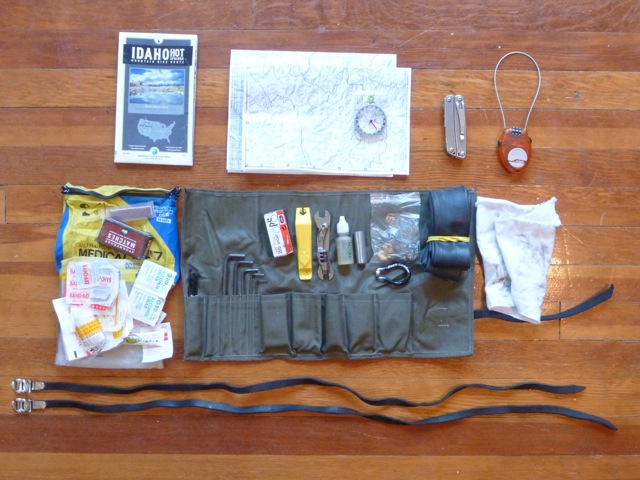
- Idaho Hot Springs MTB Route Map (shows 90% of Smoke ‘n’ Fire route)
- Relevant photocopied map pages from Benchmark’s Idaho Road and Recreation Atlas
- Compass
- Leatherman Wingman multi-plier
- Bakoda Cable Lock (for a little peace of mind when making resupply stops)
- First Aid Kit w/ alcohol swabs, misc. bandages, anti-chafe cream, moleskin patches, waterproof matches.
- DIY Tool Roll with 6, 5, 4, 3, 2mm hex wrenches, vulcanizing patches and glue, 9 and 10-spd quick-links, tire lever, DIY multitool with chain tool, 8, 9, 10mm open wrenches and bottle opener, chain lube, duct tape, spare Crank Bros cleat, misc. spare hardware, spoke wrench, tube, rag.
- DIY leather “Junk Straps”
- Not Pictured: Topeak Road Master Blaster frame pump (on bike)
Electronics
The escape from our screen-filled, flickering electronic world of ones and zeros is an appealing feature of these kinds of rides. They allow you an opportunity to get back to a more immediate, unplugged, unfiltered, simplified existence. This is why I carry a minimum of electronic distractions. I brought an iPod on the Oregon Outback thinking I might need the music for extra motivation but never used it. I’m constantly shocked and amazed by the desire people have to carry all the mess and noise of the modern world with them into the backcountry. However, I do appreciate GPS technology for simple route-following and ride tracking, love my digital camera and struggle to imagine a world before high-powered LED lighting. The lynchpin of this setup is the dynamo hub on my bike which powers my main headlight and a USB charger that allows me to recharge most of my devices on the go.
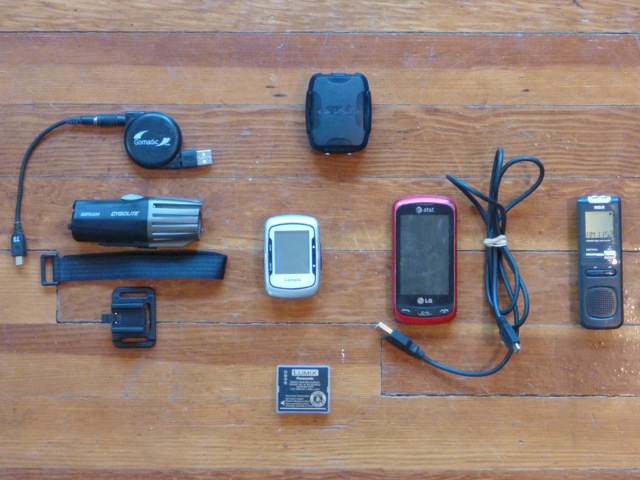
- Cygolite Expilion 700 USB-rechargable headlamp w/helmet mount
- Garmin Edge 500
- Gomadic Charging Cable (specific to Edge 500, also charges the Cygolite)
- SPOT Tracker
- Cell Phone & Charging Cable
- Digital Voice Recorder (easier than a paper journal for ride notes)
- Spare Battery for Panasonic Lumix DMC-TS2 (Camera not pictured. Guess why.)
- On Bike, Not Pictured: Supernova E3 Pro Headlamp and Sinewave Cycles Reactor USB Charger, powered by Shimano DH-3N80 generator hub. Portland Design Works Radbot Taillight
Clothing
Similar to tools and spares, this is another department where it is easy to overpack in a vain attempt to be prepared for anything. In my estimation, if there isn’t a time where I’m wearing nearly every article of clothing I packed, I brought too much. I’ve fallen in love with wool shirts as opposed to the wicking synthetics typically used in technical clothing. They seem to hold just enough sweat or water next to my skin to allow it to cool me off when hot and never feel chilly or clammy when cold. For a trip like this where I don’t plan to spend much time in towns or in camp I don’t bring changes of clothes. I’ll be stinking to high heaven after a few days but bringing extra clothes just for the luxury of feeling a little more “civilized” isn’t worth it to me. However, with early morning temperatures expected to be below freezing in the high places I want to give myself the best chance of staying warm.
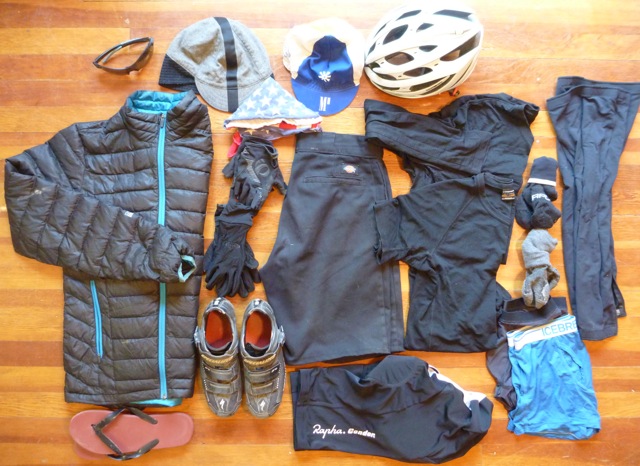
- Smith Pivlock v90 sunglasses, platinum lens
- Wool cycling cap w/earflaps
- Generic cotton cycling cap
- Lazer Genesis helmet
- Sierra Designs Gnar Lite down jacket
- Pearl Izumi cut-off half-finger gloves
- Seirus softshell long-finger gloves
- Dickies cut-off shorts
- Icebreaker wool long-sleeve
- Icebreaker wool short-sleeve
- Wool socks, thin
- Wool socks, thick
- Leg Warmers
- Synthetic (quick drying) underwear for hot spring or river dips
- Icebreaker wool underwear
- Rapha bibshorts
- Specialized Pro MTB shoes
- Cheap flip-flops
- Not Pictured: Giro Insulated Vest
Hygiene and Hydration
I tend to keep things pretty simple here as well, especially for short trips like this. I find some kind of electrolyte supplement to be a big help for warding off cramps. I also get tired of plain water and like having one bottle of water and one of some kind of drink mix on the bike at all times, mixing up the flavors for some variety. It’s easy to get sick of a particular taste when you’re sucking it down hour after hour, day after day.
For a trip this short, I’ll make do with quick stream baths to get the worst of dust and dirt off but would never go without my toothbrush! However, I will use alcohol wipes in my first-aid kit to keep my backside clean. The last thing I want to deal with is an infected saddle sore.
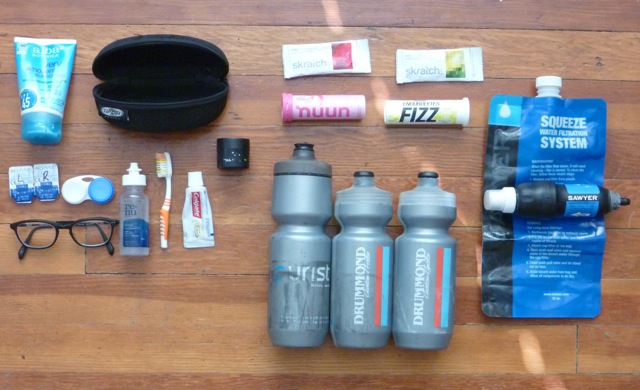
- Sunscreen
- Hardshell sunglass case for glasses and toiletries
- Spare contact lenses
- Lens Case
- Contact Solution
- Glasses
- Toothbrush
- Toothpaste
- Chamois cream
- Skratch Labs drink mixes
- Nuun electrolyte tablets
- Hammer Fizz electrolyte tablets
- Sawyer Squeeze water filter and bag
- Water Bottles, two 22 oz., one 26 oz.
Cooking and Nutrition
This is one area that I tend to overprepare in. In an ideal world, I would carry just enough food to get me to my next resupply location without going hungry. In the real world, I’d always rather have a little extra. I also never know what I might find at unfamiliar stores so I prefer to carry a larger supply of food that I know packs well and keeps my fire fueled rather than making do with whatever I can get my hands on. Also, this prevents me from being at the mercy of small country markets that often have irregular and unpredictable business hours. There is comfort in the knowledge that if shit hits the fan I won’t be going hungry.
For rides like the Smoke ‘n’ Fire, some light-and-fast purists will leave the cookset at home. For me, the comforting, morale-boosting ritual of preparing and enjoying a warm meal or hot beverage is well worth the extra gear and preparation time. I prefer to cook simple dehydrated meals where I can just boil a small pot of water and add food. This allows me to carry my simple, compact and lightweight alcohol stove. There are lots of dehydrated food options at grocery stores with well-stocked bulk departments in addition to the freeze-dried meals available at outdoor stores. Typically, I’ll carry oatmeal with dried fruit, granola or trail mix for breakfast and some kind of soup or bean mix for dinner. I’ll supplement these bases with whatever I pick up along the way. Jerky, smoked fish, tuna packets, summer sausage and cheese are favorites for quick protein and require no additional cooking. I’ll also try to pick up fresh fruit where possible and eat it immediately since it doesn’t pack well. When time and funding allows, a break for a hot meal in town is always a morale booster and gives me a chance to take on extra calories that I don’t have to carry.
On the bike, I’ll eat just about anything. I like prepackaged food bars for ease of carrying/consumption, calorie density and variety of flavors/nutrients. ProBars are among my favorites and I rarely get tired of them. I’m excited to try out Revelate’s handlebar-mounted feedbag on this trip as it will allow me to have a bag of trail mix or other snacks easily accessible for one-hand munching. In the past, I’ve finished trips with huge quantities of trail mix left over because it is so difficult to eat while riding and I’m typically eating my breakfast or dinner if I’m in camp.
For many of us, a hot cup of coffee in the morning is not a luxury but a necessity. However, coffee beans and the apparatus needed to prepare them can be difficult to justify carrying and create additional waste that must be dealt with in a responsible way. Fortunately, Starbuck’s VIA or Mount Hagen instant coffee packets are a workable substitute. I’d much rather drink VIA than actual Starbuck’s coffee; at least it isn’t burned yet. I also enjoy a warm cup of caffeine-free tea in the evenings while taking in the stars. Lemon ginger tea with a splash of whiskey is a pretty delightful nightcap!
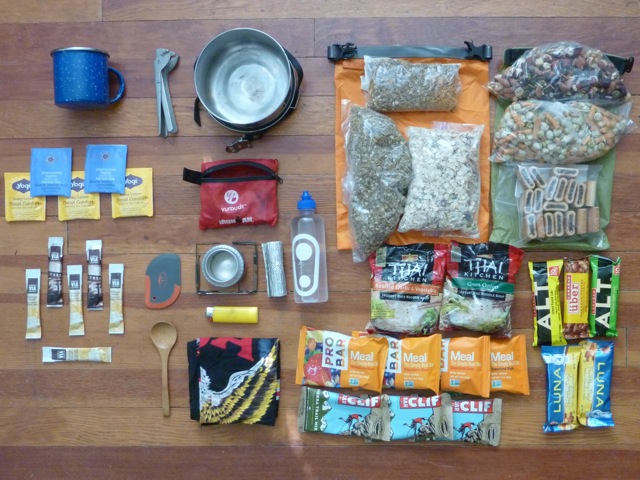
- Enameled Cup
- Pot Gripper
- MSR 1-liter stainless steel pot w/lid
- 1 cup Refried Bean mix
- 3 cups Lentil Soup mix
- 4 cups Oatmeal w/dried mixed fruit
- 2 Thai Noodle Soup packets
- Trail Mix
- Sesame Cheddar Sticks and Wasabi Peas
- Fig Bars
- 12 assorted Energy Bars
- Handkerchief
- Bamboo Spoon
- Pot Scraper
- DIY Beer Can Alcohol Stove
- DIY Bicycle Spoke Pot Stand
- DIY Aluminum Foil Windscreen
- Denatured Alcohol
- Lighter
- Starbuck’s VIA Instant Coffee
- Assorted caffeine-free Tea Bags
I think that’s everything! Did I forget anything? Now for the task of packing it all into my bags and onto the bike! Packing strategies also vary widely but that’s a topic for another post. Until then, here’s a photo of the Rando-Gnar all packed up at the start of the Oregon Outback.
In my next pre-ride post I’ll get into some of the planning, strategizing and goal-setting I like to do when assessing a route. Follow the link to read on!
Thanks for reading; I look forward to your comments and feedback!
[Looking for more Smoke ‘n’ Fire content? Check out Ryan’s post-ride recap here.]