For ages, they’ve been the standard. They’re nearly as ubiquitous as racks and panniers on touring bikes around the world but can also be found on road racing steeds, track bikes, cyclocross machines, commuting rigs or even mountain bikes. I’m talking about drop bars. Ask just about anyone what a bicycle handlebar looks like and they’ll likely describe the ramhorn bends of a drop bar. They come on many of our favorite new bikes, like Surly’s Long Haul Trucker, Disc Trucker, Cross-Check and Straggler. It isn’t tradition alone that keeps these gracefully curved tubes on the front of so many different bikes. Drop bars offer an effective and comfortable range of hand and body positions that are excellent for a great variety of riding styles and terrain. There are hundreds of subtle variations in shape available, each with differing reach, drop, width and bend to provide a rider with the perfect fit. In short, drop bars are awesome.
However, there are situations where a drop bar leaves much to be desired. Take a look at mountain bikes or off-road motorcycles and you’ll see what I mean. In order to maneuver his machine through difficult terrain, the off-road rider needs a neutral or slightly rear-biased body position and plenty of leverage. A wide, flat, slightly backswept handlebar does just that. What that flat handlebar doesn’t do is provide a multitude of hand and body positions. For the singletrack rider who is constantly moving and shifting her weight over the bike this is not a big drawback. Her riding position changes independent of her grip on the handlebars. For the touring or bikepacking rider who may cover long stretches of flat and smooth terrain in between steep and rough sections, the limited hand positions offered by a flat bar can lead to soreness, stiffness and accelerated fatigue. This is why we see so many bikepacking bikes with aerobars clamped onto flat bars. The rider needs alternative hand and body positions to ride comfortably for hours at a time.
So – as in most things – a middle ground must be sought and the unconventional thinker often arrives at the ideal solution. When it comes to handlebars for off-road touring and a variety of other applications, Jeff Jones’ Loop H-Bar may just be that solution. A great deal has already been written about the H-Bar’s merits – much of it by Jeff Jones himself – so I won’t waste time adding to the mountain of praise already heaped on these bars. In many ways, the H-bar neatly splits the difference between a drop bar and a flat bar, retaining the best characteristics of each. It offers the width and leverage of the flat bar, the forward reach and hand positions of the drop bar and much more room to shift weight rearward. In addition, the Loop-H bar’s forward extension offers a perfect location for strapping a handlebar roll. Revelate even offers a special 4-point attachment kit to neatly secure their Sweetroll to the Loop-H bars.
The astute reader may recall that I have been considering a different handlebar for my dirt touring bike ever since my experience on the Smoke ‘n’ Fire 400. Given the large number of other touring riders who may be pushing the limits of their drop bar setups and looking for alternatives, I thought I’d share some thoughts and experiences from the process and try to provide a setup guide for H-Bars on a touring or bikepacking bike.
Assuming you’ve settled on the H-Bar as the right handlebar for your application, there are a few other components you’ll need to effect the conversion. Since my bike and most of the touring bikes we sell are spec’ed with drop bars and bar-end shifters, I’ll walk you through that process. If your bike has integrated shifters or downtube levers, your process and the parts needed will be different.
So, let’s get down to the details. What do you need to make the conversion from drop bars to H-Bars on your bike? Every bike is different and there is no one perfect setup. Many of these questions you’ll have to answer for yourself – especially when it comes to fit. I do not claim to be a fit expert and have arrived at positions that work for me through a combination of self-education and trial-and-error. If in doubt, consult a trained bicycle fitting professional in your area before making any dramatic changes to your riding position.
First: Pick Your Handlebars
Jeff Jones offers three different handlebars that provide the same basic positioning but in slightly different shapes and widths. They are the Loop-H, Cut-H and Bend-H. They are all available in 660 or 710mm widths and a variety of materials. If you’re planning on using a handlebar roll (especially the Revelate Sweetroll), you’ll be happiest with the Loop-H. If you won’t be strapping much gear to the bars, don’t need as much forward extension but want the width and backsweep in an elegant shape, get the Bend-H. Other than aesthetic preference, I don’t think there is much to recommend the Cut-H over the Loop. Also, there isn’t really much reason to choose the 660mm width as the handlebars are clearly marked for cutting, if desired. I would encourage anyone other than the smallest riders to try the wide bars first. You just might like them and you can always trim them later. For my purposes, I went with a silver, aluminum Loop-H Bar in a 710mm width.
Second: Pick Your Stem
Now things get complicated. Bicycle fitting is a highly complex topic with very little good research to draw on outside the racing world. The makeup of a comfortable and efficient riding position is different for everyone, so I’ll do my best to offer helpful guidelines you can use to find your own sweet spot. Jeff Jones wrote a useful blog post on choosing a stem to pair with your H-Bar but it is geared toward riders moving from flat bars to H-bars. Since we’re talking about drop bars here, I’ll take you through some of the questions you’ll be faced with.
There are two important variable to consider when choosing your stem: reach and stack. Reach describes the horizontal position of the bars, or how far out they are. Stack (or drop) describes the vertical position of the bars, or how far above or below the saddle they sit. Reach and stack can be measured in a variety of ways but since we’re talking about converting an existing cockpit assumed to be comfortable, I’ll talk about them in more relative terms.
First, let’s talk reach. Most people find that their favorite hand position on drop bars is on the brake hoods or the “ramps” of the bars just behind the hoods. Assuming you are reasonably comfortable on your drop bars, I recommend setting up your H-Bars so that the forward extension gives the same reach as the farthest forward position you can reach on the brake hoods. This will give you roughly the same amount of room to stretch out forward but with much more space to shift your weight back. In this position I found that the junction of the grip section and crossbar landed right on the ramps, providing an ideal perch to simulate the sweet spot on my drop bars. It is worth pointing out that the total front-to-back reach of the Loop H-Bar is significantly longer than a typical drop bar. Compared to roughly 5.5 inches of reach on an average drop bar from the front of the brake hoods to handlebar center, the 710mm Loop H-Bars measure a full 9 inches from the center of the forward extension to the center of the rearmost portion of the grip area. Most of this additional real estate comes in the widest, rearmost grip position. Avoid the temptation to set your bars farther forward to favor this grip position as it will render the forward extensions unusable and prevent you from shifting your weight farther back for descents.
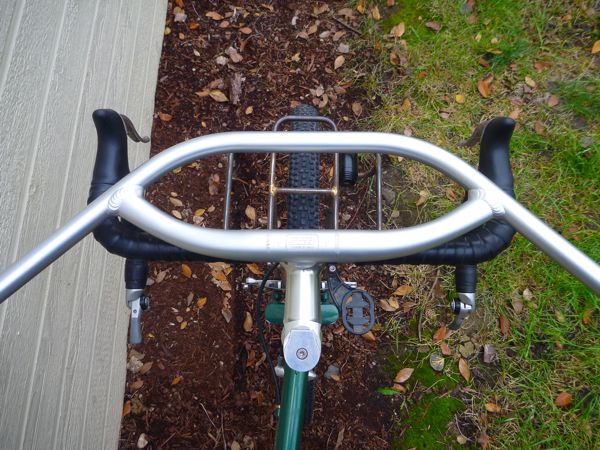
With the H-Bars positioned in the manner pictured above, I estimated that I would need to shorten my stem by 1cm to secure them in place, so I settled on a 90mm long stem.
Now let’s talk stack, or drop. For most riders, positioning the H-Bars so they are roughly level with the saddle yields a comfortable, neutral riding position with good weight distribution between handlebar, pedals and saddle. Depending on your current setup, you’ll likely need a stem with more rise or up-angle to achieve this. By changing my stem from a -10 degree to a 0 degree, I raised the handlebars by roughly 1.5cm, putting them just a hair lower than my saddle.
If you need to raise the bars more than a couple centimeters this stem extension is available which clamps onto the fork steerer tube in place of the stem. The stem in turn clamps onto the extension affording up to 8cm additional stem height.
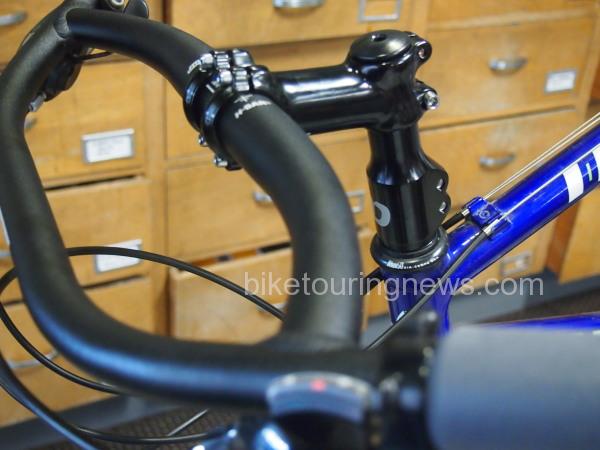
A handy extension for getting the bars up to the desired height.
All of the Jones bars have a 31.8mm clamping surface, so be sure that any stem you purchase will fit the handlebar and your bike’s steerer tube to avoid disappointment. Thomson’s X4 mountain bike stem is an excellent choice but we offer several less expensive options as well.
Third: Choosing Brake Levers and Shifters
After the complexity of the stem question, the remaining decisions will be fairly straightforward. When choosing brake levers, you’ll want a flat-bar, MTB-style lever that pulls the proper amount of cable for your brakes. Cantilevers, centerpull, sidepull and road disc brakes use a short pull. V-brakes and mountain disc brakes use a long pull. Also, I highly recommend levers with a good reach-adjustment mechanism for the H-Bars. You will need to replace the brake cables and housing so if the new brake levers don’t include cables and housing you will need to purchase those separately.
If you have bar-end shifters, Paul Components’ Thumbies provide a clean and elegant way to mount your shifters on top the Jones Bars and use them as thumb shifters. The bar end shifters will work in the ends of the Jones bars but, given the width and the sweep of the bars, this might be a little functionally awkward.
Hope this guide offers some help and direction to those considering a swap to the Jones Bars.