A bicycle with disc brakes can present some challenges when it comes to attaching fenders and, sometimes, racks. Especially tricky is the front wheel where the brake caliper is bolted onto the adapter on the back side of the left fork blade. In my experience the Gilles Berthoud stainless steel fenders are the perfect fender for the Surly Disc Trucker or the Long Haul Trucker for that matter. The single stay for both front and rear fenders is easier to deal with than the twin stay design of most composite fenders. The stays attach low on the backside of the front fender which not only looks elegant but cleanly routes the stay below the front brake caliper.
Having installed dozens of these fender sets, it occurred to me that some people might be interested in a short tutorial on how to go about it. So hopefully this will be useful.
Installation tools needed:
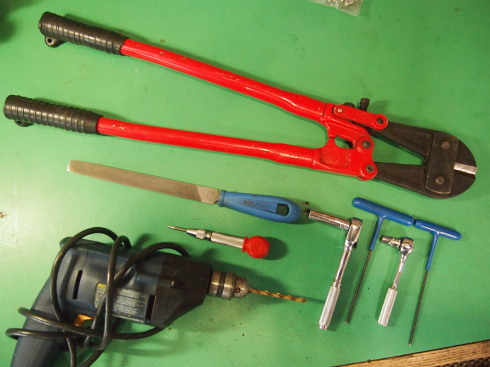
A person could get by with a Dremel cutoff tool or a hacksaw instead of the bolt cutters. Everything else is pretty essential. Only one hole needs to be drilled and that in the rear fender at the brake bridge.
– Drill with a sharp 5mm or 13/64″ bit.
– Cloth tape measure or a piece of string to find the center of the fender.
– 10mm and 7mm socket or box wrenches
– 3mm and 2.5mm hex wrenches
– Bolt cutters or Dremel tool with a cutoff blade. (A hacksaw will work in a pinch).
– Metal file
– Metal punch to start drill bit
– Permanent marker (Sharpie)
Parts Included:
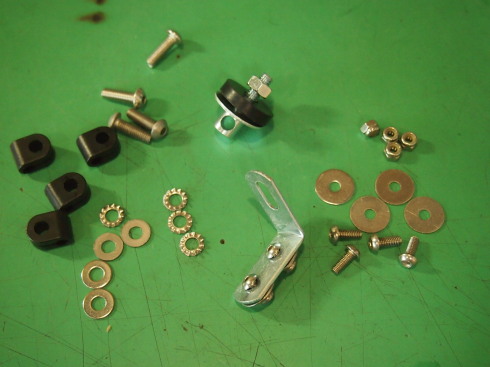
4 p-clamps with bolts and washers. Daruma bolt. L-bracket. 4 bolts, washers and nuts to attach stays to fenders
Front Fender:
The Gilles Berthoud fenders are packaged with an eyebolt or “daruma” bolt for the front fender. Berthoud assumes the bike will have either sidepull or centerpull brakes and the eye of the daruma bolt slips over the brake bolt and dangles down out of the bottom of the fork steer tube. If your bike has cantilever or disc brakes you will need a 5mm or 6mm bolt long enough to go completely through the fork crown (Hopefully your bike has a hole drilled through) with enough thread left over to screw on a nut with a lock washer. A 35mm bolt usually is long enough for this.
The front fender receives the dangling daruma bolt through the pre-drilled hole and is spaced away from the fork crown with the included metal fender washer and rubber washer. Berthoud also assumes the bike will have a 1″ steer tube so for a 1 1/8″ steer tube I use a larger fender washer than the one supplied.

Dangling daruma.

Here the front fender is attached with the large metal fender washer and rubber washer. The daruma bolt hangs inside the steer tube from the bolt through the fork crown. A 10mm nut on the bottom side of the fender threads onto the daruma and holds everything in place.
Here is the attachment of the fender stay to the front fender. I like to put the pan head bolt on the inside and the nuts on the outside to mitigate debris collection between the tire and the fender.
I usually bolt on the front stays before I make the fork crown attachment and I loosely screw the fender stay p-clamps to the holes in the fork dropout. Once the fender is in place at the fork crown I put the tire back on the bike and hold the back end of the fender in place while I line up the ends of the stays with the p-clamps and mark them with a sharpie where they will need to be cut. I snip off the ends with a pair of bolt cutters (the Dremel tool or a hack saw could be used here) and file the sharp edges before slipping them into the p-clamps for final tightening.

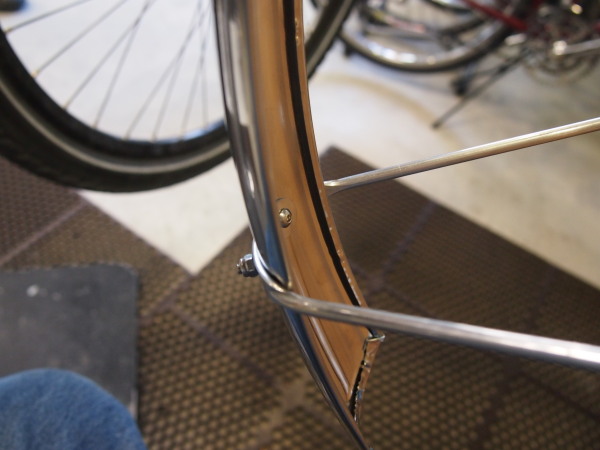
This is obviously the rear wheel but I mark the stays for the front in the same way. The black p-clamp is lightly bolted onto the bike and with the fender held in place the stay (blurry in this picture, I know) is marked where it will end up flush with the end of the clamp.

With the installation finished, the stay sweeps neatly under the front disc brake caliper.
Rear Fender:
A bicycle with a well thought out design for the rear wheel disc brake adapter places the caliper inside the triangle created by the seatstay and chainstay, where it is out of the way of the fender stay attachments. As such, the rear fender is usually less of a challenge; at least relative to the disc brake. But the installation usually involves removing and replacing the wheel several times in order to make adjustments to the fender line.

Dry fit of the rear fender.
I start by holding the rear fender in place to see how much clearance there is at the front, between the chainstays and between the fender and the bridge between the chainstays. Usually, a spacer, which can be anything from a sawed off wine cork to a piece of aluminum tubing to 3 or 4 of those little washers that screw onto tube valve stems, is required between the bridge and the fender.

Here is the first attachment. I used a piece of aluminum tubing from the hardware store for a spacer. Sawed off wine bottle corks work too. Oh, you might need a longer bolt here.
This is the first solid attachment I make. Again, the stays are bolted onto the fender before I start, so once I make the first attachment I can put the wheel back on and hold the rear end of the fender in place to mark where I want to cut the stays. Once those are cut to length and the sharp edges filed off they can be clamped into the p-clamps. There is one final, crucial step to installing the rear fenders. After the fender line has been established, and everything is held in place on the bike with the connections I have already made, it is time to drill a hole in the fender where it will be bolted onto the brake bridge. Here is the third assumption that Berthoud makes; that the bike in question has a threaded hole on the bottom of the brake bridge into which a bolt holding the fender can be screwed. If the bike does have the threaded hole then it is relatively simple to mark the spot on the fender and drill the hole. To find the spot to drill the hole for an L-bracket, bolt the bracket onto the brake bridge and, holding the fender at the desired clearance from the tire, mark the hole locations with the Sharpie.


It’s easier to make this mark if the L-bracket is bolted onto the brake bridge.
Mark the hole and find the center of the fender crown using the cloth tape measure or the string. The metal punch is sort of critical because stainless steel is hard and the drill bit will wander around before starting to cut if there is not some sort of indentation for a guide. A one-hand-held spring punch is ideal for this.
I just read through this instructional and it seems sort of complicated for the average person who doesn’t do this sort of thing everyday. I can say that installing fenders takes way more time than I can reasonably charge for. However, if one has some patience and a modicum of skill, or desire to learn, along with a few tools, it can be sort of rewarding. Then there is the opinion (mine) that a touring bike only looks complete after fenders have been installed. Hope this helps somebody. Please comment if I have left anything out or left you more confused than when you started reading.
Martin Nilsson October 8, 2015, 6:04 am
Hi
Just want to thank You for a beautyful tutorial. I am about to install a pair Berthoud fenders on my 56 cm Surly DT , when my wife and kids go to grandma in England for a week. That will give me peace and quiet to finally get the bike together. Always wanted an LHT , but got an even nicer bike with the disc option. Have been gathering the parts during the last three years. Excited!
Cheers
Martin from Sweden
Sky King October 8, 2015, 6:11 am
Enjoy! Install early in the week and get some rides in too 😉
Martin Chan February 23, 2016, 12:15 am
Hi
Is your disc trucker with 700cc tires??
Martin Chan February 23, 2016, 12:18 am
I have order the Gilles Berthoud fender for my 52 cm 26’tires, all the tool for installation is not suitable. The daruma bolt and L bracket is too short and cause a large gab between the fender and tires !!!
Bike Hermit® February 23, 2016, 10:31 am
Martin,
You need the Problem Solvers Fender Flute. Then you can ditch the daruma bolt and just use an L-bracket.
Alan Witt September 12, 2017, 6:49 am
I agree with your point about it being rewarding. I’d read so many horror stories of getting mudguards fitted (along with my LBS saying it was their least favourite job this side of stopping pressfit BBs from creaking) that I approached the task with trepidation. However, with the right tools and attention to detail I got everything installed and looking elegant in just over an hour. The guards are rock-solid, keep me and my bike dry, and unlike so many installs I’ve seen actually closely follow the arc of the wheel.
I’m almost (almost!) tempted to offer a guard fitting service to friends, it was that enjoyable.
Kaarle December 26, 2017, 2:34 pm
Hi!
These truly are good instructions! I have a 56cm 700c Long Haul Trucker and was wondering if it is possible to fit the 60mm fenders (so I could use 2,25” tyres)? Do you think there’s enough clearance for that (in the chainstay)?
Ryan King January 5, 2018, 10:34 am
Howdy! Thanks for the question. In our experience, 60mm Berthoud fenders are just a little bit too tight of a fit on the 700c Truckers to be ideal. They can be mounted but require a pretty significant pinch at the chainstays and between the fork legs. A 2.25″ tire is pushing the limits of what the Trucker will clear, even without fenders. IF you’re looking to go that wide you’ll almost certainly need to leave the fenders off. We typically recommend a 40 or 42mm (~1.5″ to 1.75″) tire with a 50mm fender as the sweet spot for the Trucker. I hope this helps! Feel free to call the shop or email me directly if there is anything else I can do to help!
Cheers,
Ryan
Summer April 21, 2018, 7:35 pm
You talk specifically about the 700c Trucker, does this mean 26″ ones are easier to fit? And just to make extra clear, are the fenders installed in this how-to 50mm ones? 1.75″ tires are a bit fatter than what’s normally recommended for 50mm Berthouds, but if you’ve had positive experiences with the combo that’s all I need to know. Again, anything that would differ from the how-to in this post for a 50cm 26″ frame? Thanks!
Ryan King April 25, 2018, 12:17 pm
Howdy, Summer! If I’m not mistaken, the bike in the blog post has 26″ wheels and we installed 60mm fenders. That combo works great on the 26″ bikes. 2.0″ or even some 2.1″ tires will be your max with fenders on those bikes. I hope this helps!
Eugene April 16, 2018, 5:42 pm
Thanks for this tutorial, they look really nice. Do you have a recommendation on which width to purchase for a 700c LHT?
Ryan King April 21, 2018, 12:25 pm
Howdy, Eugene! Thanks for the question. Generally speaking, we recommend the widest fenders that your bike’s clearances will allow, regardless of the tire width you’re running. The 60mm fenders fit well on the LHT, though they usually require a little squeeze at the chainstays. 50mm work fine also if you’re running narrower tires. I hope this helps! Let us know if you have any more questions and thanks for reading.
-Ryan